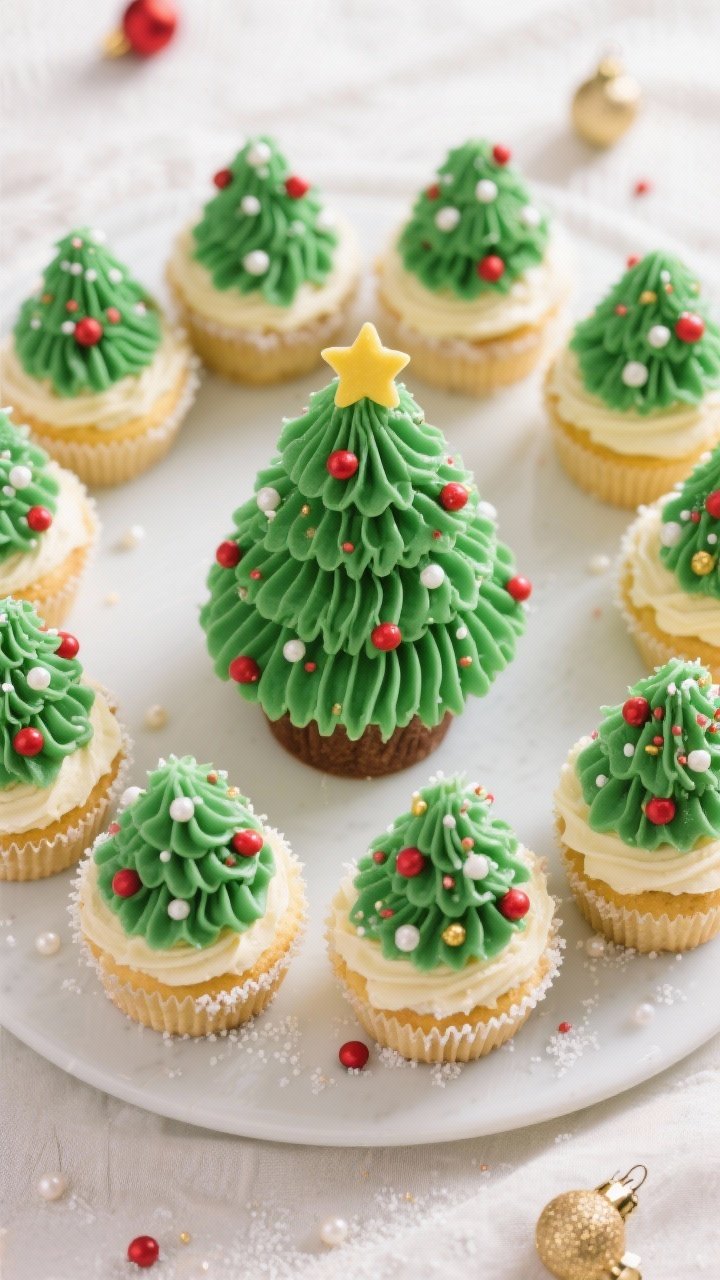
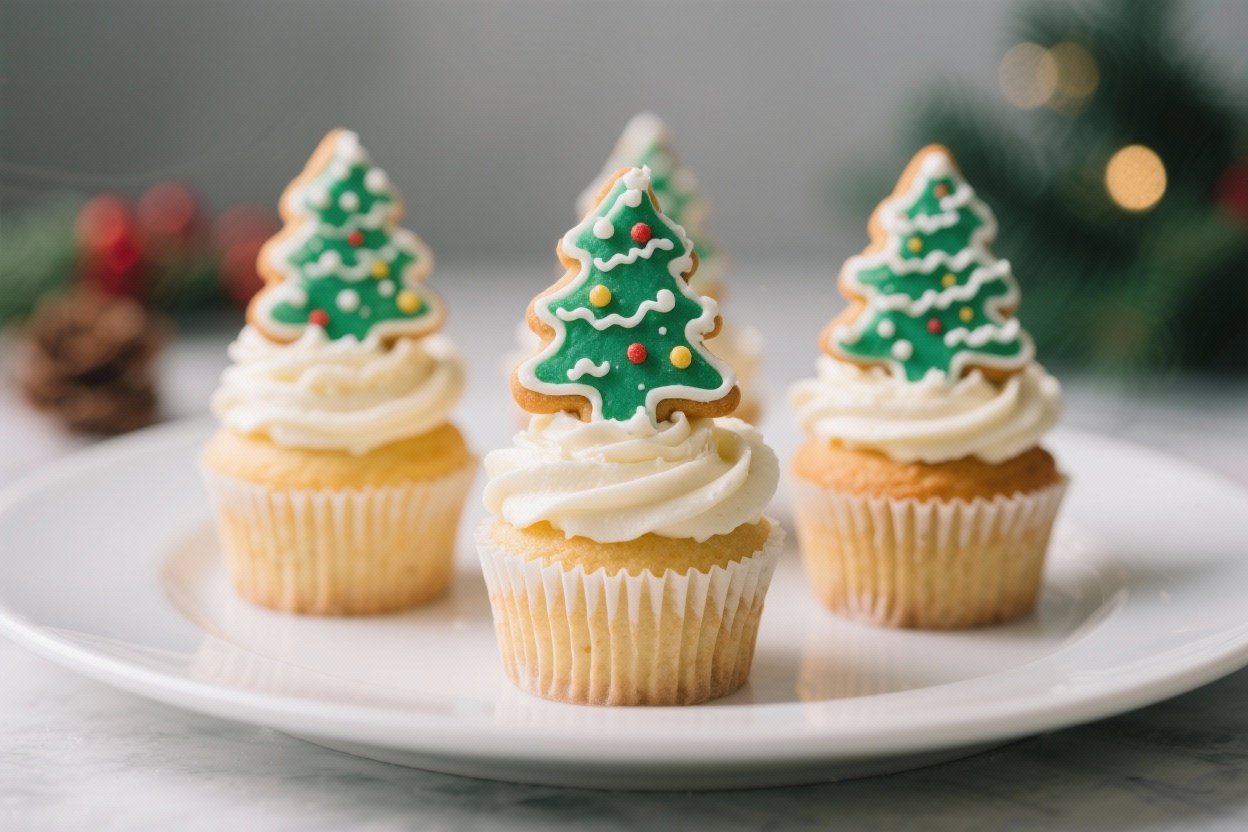
Christmas Tree Cupcakes With Vanilla Buttercream – Quick and Easy
Sugar cookie Christmas Tree Cupcakes bring together two holiday favorites: buttery sugar cookie flavor and fluffy vanilla buttercream, dressed up like tiny trees. They’re cute enough for a party centerpiece and simple enough to make with kids. You get soft, tender cupcakes, a creamy frosting that pipes beautifully, and playful decorations that feel cheerful without being fussy.
Whether you’re hosting a cookie swap or just want a cozy baking day, these cupcakes are a win. They taste like the holidays, and they look the part, too.
What Makes This Christmas Tree Cupcakes With Vanilla Buttercream – Quick and Easy Special
These cupcakes capture the classic, buttery sweetness of sugar cookies in a soft, moist cake. The vanilla buttercream is silky and stable, perfect for piping tree shapes that hold up on the dessert table.
You don’t need complicated tools—just a star piping tip and some sprinkles. Best of all, the decorations are customizable, so you can keep it simple or go all-out with ornaments and sparkle.
Ingredients for Christmas Tree Cupcakes:
-
- 1 1/2 cups all-purpose flour
- 1 1/2 teaspoons baking powder
- 1/2 teaspoon fine salt
- 1/2 cup (1 stick) unsalted butter, softened
- 3/4 cup granulated sugar
- 1 large egg + 1 large egg white, room temperature
- 1 1/2 teaspoons pure vanilla extract
- 1/4 teaspoon almond extract (optional, but recommended for sugar cookie flavor)
- 1/2 cup whole milk, room temperature
- 1/4 cup sour cream, room temperature
- For the Vanilla Buttercream:
- 1 cup (2 sticks) unsalted butter, softened but cool
- 3 1/2–4 cups powdered sugar, sifted
- 2–3 tablespoons heavy cream or milk
- 2 teaspoons pure vanilla extract
- Pinch of fine salt
- Green gel food coloring
- For Decorating:
- Assorted sprinkles (nonpareils, stars, pearls)
- Edible glitter or sanding sugar (optional)
- Small yellow star sprinkles or candy stars for toppers
- Piping bag fitted with a large star tip (Wilton 1M or similar)
Instructions for Christmas Tree Cupcakes
- Prep your gear. Heat the oven to 350°F (175°C). Line a 12-cup muffin pan with paper liners.Set out cold ingredients so they reach room temperature.
- Mix the dry ingredients. In a bowl, whisk flour, baking powder, and salt. Set aside.
- Cream the butter and sugar. In a large bowl, beat butter and granulated sugar on medium speed until light and fluffy, about 2–3 minutes. This traps air for tender cupcakes.
- Add eggs and flavor. Beat in the whole egg, then the egg white, scraping the bowl.Mix in vanilla and almond extract.
- Combine wet and dry. Stir the milk and sour cream together. Add the dry ingredients to the butter mixture in two additions, alternating with the milk mixture, starting and ending with dry. Mix on low just until combined.Do not overmix.
- Fill and bake. Divide batter among liners, filling each about 2/3 full. Bake 16–19 minutes, until a toothpick comes out clean and tops spring back lightly. Cool in the pan 5 minutes, then transfer to a rack to cool completely.
- Make the buttercream. Beat butter on medium-high until creamy, 1 minute.Add 3 1/2 cups powdered sugar, vanilla, salt, and 2 tablespoons cream. Beat on low to combine, then on medium-high for 2–3 minutes until fluffy. Adjust texture with more sugar (thicker) or cream (softer).
- Tint the frosting. Add green gel food coloring a little at a time.Mix until you reach your preferred tree shade. Gel color works best because it won’t thin the frosting.
- Pipe the trees. Fit a piping bag with a large star tip and fill with frosting. Hold the bag vertically over a cooled cupcake.Pipe a small swirl for the base, then a slightly smaller swirl on top, and another smaller one to create a tree shape. Pull up to a point.
- Add decorations. While the frosting is fresh, add sprinkles as “ornaments.” Place a star sprinkle on top. A light dusting of sanding sugar adds a snowy sparkle.
- Set and serve. Let the cupcakes sit 10–15 minutes so the frosting sets slightly.Serve at room temperature for the best texture and flavor.
How to Store Christmas Tree Cupcakes
Keep cupcakes in an airtight container at cool room temperature for up to 2 days. If your kitchen is warm, refrigerate for up to 4 days, but let them come to room temperature before serving for the creamiest frosting. You can freeze unfrosted cupcakes for up to 2 months; thaw at room temperature, then frost fresh.
Buttercream can be refrigerated for 1 week or frozen for 2 months—bring to room temp and re-whip before using.
Benefits of This Christmas Tree Cupcakes Recipe
- Festive look, simple techniques: Piping a tree is easy and forgiving, yet visually impressive.
- Balanced sweetness: The almond-vanilla combo gives a classic sugar cookie taste without being cloying.
- Make-ahead friendly: Bake the cupcakes a day ahead and frost when you’re ready to serve.
- Kid-approved and interactive: Decorating with “ornaments” is a fun activity for all ages.
- Customizable: Swap colors, add flavors, or change toppings to match any holiday theme.
What Not to Do
- Don’t overmix the batter. It leads to dense cupcakes. Mix just until the flour disappears.
- Don’t frost warm cupcakes. Heat will melt the buttercream and collapse the tree shape.
- Don’t use liquid food coloring. It thins frosting. Use gel for bold color and stable texture.
- Don’t skip the salt. A pinch in the buttercream balances the sweetness.
- Don’t overfill liners. Two-thirds full gives a nice dome without spilling.
Recipe Variations
- Peppermint Twist: Add 1/2 teaspoon peppermint extract to the frosting and top with crushed candy canes.
- Gingerbread Sugar Cookie: Add 1 teaspoon ground ginger and 1/2 teaspoon cinnamon to the cupcake dry ingredients.
- Chocolate Tree Base: Stir 1/2 cup mini chocolate chips into the batter or swap 3 tablespoons flour for cocoa powder.
- Snowy Trees: Keep frosting white, pipe trees, and dust heavily with powdered sugar or coconut flakes.
- Filled Cupcakes: Core cooled cupcakes and add a spoonful of raspberry jam, lemon curd, or chocolate ganache before frosting.
- Dairy-Free Option: Use vegan butter and a non-dairy milk for both batter and frosting.Choose shortening plus vegan butter for a firmer pipe.
Can I make these Christmas Tree Cupcakes gluten-free?
Yes. Use a 1:1 gluten-free baking flour blend with xanthan gum. Let the batter rest 10 minutes before baking to hydrate the starches, and check for doneness a minute or two early.
What if I don’t have a piping tip?
Use a zip-top bag with a 1/2-inch corner snipped off.
Pipe stacked rings to mimic a tree, then use a butter knife to add texture. It won’t be as defined as a star tip, but it still looks festive.
Can I cut the sweetness?
Use salted butter in the frosting and add an extra pinch of salt. Lemon juice (1 teaspoon) or a splash of cream cheese (2 ounces beaten into the frosting) also balances sweetness nicely.
How do I get a vibrant green without using too much dye?
Start with a small amount of gel food coloring and add a tiny dot of blue to deepen the shade.
Matcha or spinach powder can add a natural tint, but they can affect flavor—use sparingly.
Why did my Christmas Tree Cupcakes sink?
Common causes are underbaking, overbeating the batter, or opening the oven door too soon. Bake until the centers spring back and a toothpick comes out clean, and keep the oven door closed for the first 15 minutes.
Can I make mini cupcakes?
Absolutely. Bake minis for 10–12 minutes.
Pipe smaller trees using a small star tip and scale down the sprinkles.
What’s the best way to transport them?
Use a cupcake carrier with tall clearance. Chill the frosted cupcakes for 20–30 minutes to firm up the buttercream before travel, then keep them cool but not cold.
Final Thoughts
Sugar cookie Christmas tree cupcakes are the kind of treat that brings smiles before anyone takes a bite. They’re simple, festive, and full of classic vanilla-cookie flavor.
With a few easy techniques and some colorful sprinkles, you’ll have a dessert that looks like it came from a bakery but feels totally homemade. Make a batch for your next holiday gathering, and watch them disappear.
Sugar Cookie Christmas Tree Cupcakes With Vanilla Buttercream - Festive, Fun, and Easy
Ingredients
Method
- Prep your gear. Heat the oven to 350°F (175°C). Line a 12-cup muffin pan with paper liners. Set out cold ingredients so they reach room temperature.
- Mix the dry ingredients. In a bowl, whisk flour, baking powder, and salt. Set aside.
- Cream the butter and sugar. In a large bowl, beat butter and granulated sugar on medium speed until light and fluffy, about 2–3 minutes. This traps air for tender cupcakes.
- Add eggs and flavor. Beat in the whole egg, then the egg white, scraping the bowl. Mix in vanilla and almond extract.
- Combine wet and dry. Stir the milk and sour cream together. Add the dry ingredients to the butter mixture in two additions, alternating with the milk mixture, starting and ending with dry. Mix on low just until combined. Do not overmix.
- Fill and bake. Divide batter among liners, filling each about 2/3 full. Bake 16–19 minutes, until a toothpick comes out clean and tops spring back lightly. Cool in the pan 5 minutes, then transfer to a rack to cool completely.
- Make the buttercream. Beat butter on medium-high until creamy, 1 minute. Add 3 1/2 cups powdered sugar, vanilla, salt, and 2 tablespoons cream. Beat on low to combine, then on medium-high for 2–3 minutes until fluffy. Adjust texture with more sugar (thicker) or cream (softer).
- Tint the frosting. Add green gel food coloring a little at a time. Mix until you reach your preferred tree shade. Gel color works best because it won’t thin the frosting.
- Pipe the trees. Fit a piping bag with a large star tip and fill with frosting. Hold the bag vertically over a cooled cupcake. Pipe a small swirl for the base, then a slightly smaller swirl on top, and another smaller one to create a tree shape. Pull up to a point.
- Add decorations. While the frosting is fresh, add sprinkles as “ornaments.” Place a star sprinkle on top. A light dusting of sanding sugar adds a snowy sparkle.
- Set and serve. Let the cupcakes sit 10–15 minutes so the frosting sets slightly. Serve at room temperature for the best texture and flavor.
Printable Recipe Card
Want just the essential recipe details without scrolling through the article? Get our printable recipe card with just the ingredients and instructions.
Hi, I’m Hannah — the food lover behind Every Day Quick Meals! I’m all about making cooking simple, joyful, and stress-free. Between work, life, and a million to-dos, I know how hard it can be to find time for homemade food. That’s why I create quick, tasty recipes that anyone can make — no fancy skills required. My kitchen motto? Good food doesn’t need to be complicated — just made with love.