Halloween Sugar Cookies with Royal Icing: Spooky-Crisp, Glossy-Glazed, and Totally Party-Stealing
You want Halloween treats that actually look like the Pinterest photo, taste like a bakery, and don’t destroy your kitchen? Good. These Halloween Sugar Cookies with Royal Icing deliver sharp edges, buttery centers, and a glassy royal icing finish that makes ghosts, pumpkins, and bats look like they hired glam squads.
The dough stays soft but holds shape. The icing dries shiny and stackable. And yes, you can make them without a culinary degree or a ring light.
Ready to become that friend—the one whose cookies are suspiciously perfect?
Why You’ll Love This Recipe

- Bakery-level look, home-kitchen effort: The dough keeps crisp edges, so your pumpkins won’t morph into sad circles.
- No spread, no stress: A chill time and the right flour ratio keep shapes intact.
- Royal icing that behaves: Smooth, pipeable, and fast-drying so you can stack and gift.
- Kid-approved, adult-worthy: Buttery vanilla sugar cookie with a light snap and tender bite.
- Make-ahead friendly: Dough, baked cookies, and icing all hold beautifully for party prep.
Ingredients
For the Sugar Cookies
- 2 3/4 cups (330 g) all-purpose flour
- 1/2 tsp baking powder
- 1/2 tsp fine sea salt
- 1 cup (227 g) unsalted butter, softened
- 3/4 cup (150 g) granulated sugar
- 1 large egg
- 2 tsp pure vanilla extract
- 1/2 tsp almond extract (optional but recommended for that bakery vibe)
For the Royal Icing
- 4 cups (480 g) powdered sugar, sifted
- 3 tbsp meringue powder
- 6–8 tbsp room-temp water (start small, add as needed)
- 1 tsp vanilla or almond extract (oil-free)
- Gel food coloring (orange, black, purple, green—Halloween core)
Optional Decorations
- Edible glitter or luster dust
- Sprinkles, nonpareils, sugar pearls
- Piping bags, #1–#3 round tips, squeeze bottles, toothpicks
- Halloween cookie cutters (pumpkins, bats, ghosts, cats)
The Method – Instructions
- Whisk your dry ingredients: In a bowl, whisk flour, baking powder, and salt. Set aside.
- Cream butter and sugar: In a stand mixer, beat butter and sugar on medium for 2–3 minutes until light and fluffy. Not greasy, not crumbly—cloudlike.
- Add egg and extracts: Beat in egg, vanilla, and almond extract until combined, scraping the bowl.
Confidence level: smooth.
- Bring it together: Add dry ingredients in two additions on low speed. Mix just until a dough forms. If it’s sticky, add 1–2 tbsp extra flour.
- Divide and chill: Split dough in half, flatten into discs, wrap, and chill 45–60 minutes.
This is your no-spread insurance policy.
- Roll and cut: Preheat oven to 350°F (175°C). Roll dough between two sheets of parchment to 1/4 inch thick. Cut shapes.
Re-chill cut cookies on the sheet for 10 minutes for ultra-sharp edges.
- Bake: Bake 9–12 minutes, just until edges are set and barely golden underneath. Overbake and you’ll be haunted by crunchy ghosts.
- Cool completely: Let rest 5 minutes on the sheet, then move to a rack. Icing + warm cookies = sliding disaster.
- Make royal icing: In a mixer bowl, add powdered sugar, meringue powder, and 6 tbsp water.
Beat on low to combine, then medium for 2–3 minutes until smooth and thick with soft peaks. Add extract and more water, 1 tsp at a time, to get two consistencies: piping (20-second) and flooding (10-second).
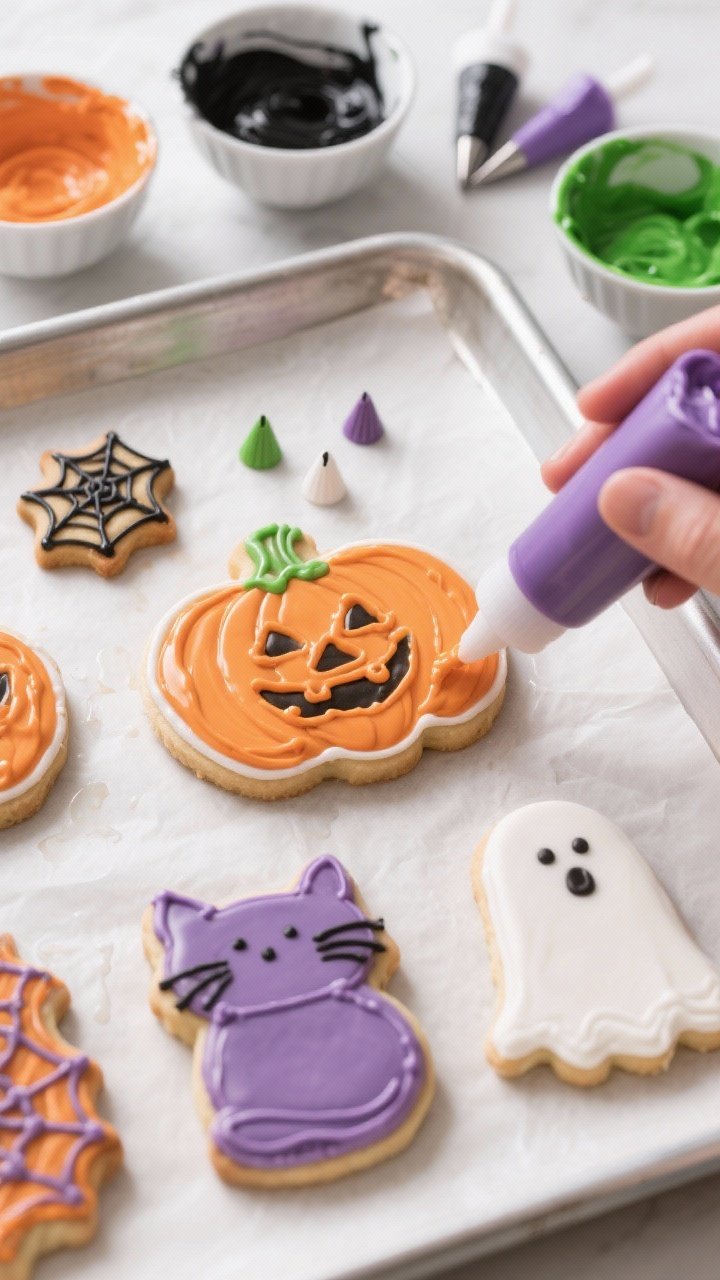
- Tint and load: Divide icing into bowls and tint with gel colors. Add a bit of water if needed.
Transfer piping icing to bags with small round tips; flooding icing to squeeze bottles or additional bags.
- Outline and flood: Pipe a clean outline on each cookie. Let set 2–3 minutes. Flood the interior with thinner icing.
Use a toothpick to nudge into corners and pop bubbles.
- Add details: Wet-on-wet for marbling (think spooky swirls), or wait 20–30 minutes to pipe raised details like spiderwebs, stitches, eyes, and jack-o’-lantern faces.
- Dry: Let cookies air-dry uncovered 6–8 hours or overnight until the icing is fully set and stackable.
Storage Tips
- Room temp: Store decorated cookies in an airtight container with parchment between layers for up to 7 days.
- Freeze undecorated: Freeze baked cookies (undecorated) up to 2 months. Thaw at room temp in their container to avoid condensation.
- Freeze dough: Wrap well and freeze up to 2 months. Thaw in the fridge overnight; then roll and bake.
- Avoid moisture: Humidity dulls shine and can cause bleeding.
Keep away from steam and fridges, FYI.
Why This is Good for You
It’s not kale, but it is connection. Baking seasonal treats is a fast-track to family rituals, creativity, and a little controlled chaos that actually feels good. The process builds skills—measuring, timing, patience—without feeling like homework.
Plus, making your own means real butter, real vanilla, and customizable sweetness.
No mystery oils or weird aftertastes. And honestly, creating edible art is a legit stress reliever—cheaper than therapy, tastier than a journal.
What Not to Do
- Don’t skip chilling. Warm dough spreads. Spread equals shapeless pumpkins and regrets.
- Don’t overbake. Pale edges are correct.
Golden-brown sugar cookies are dry, not deluxe.
- Don’t ice warm cookies. The icing will melt, pool, and look like a horror movie—but not the fun kind.
- Don’t thin icing with milk. Use water only. Dairy can dull the shine and mess with stability.
- Don’t use liquid food coloring. Gel colors keep icing consistency spot-on without flooding the flood.
Different Ways to Make This
- Brown sugar twist: Swap 1/4 cup white sugar for light brown sugar for a slightly caramel vibe.
- Citrus kick: Add 1 tsp orange zest to the dough and 1/4 tsp to the icing for a Halloween-orange aroma.
- Spiced version: Add 1/2 tsp cinnamon and a pinch of nutmeg to the flour. Cozy, subtle, and ultra-fall.
- Gluten-free: Use a 1:1 gluten-free baking blend with xanthan gum.
Chill thoroughly and roll slightly thicker.
- Dairy-free: Use a good plant butter (stick style). Flavor and texture hold up surprisingly well, IMO.
- Chocolate cut-outs: Replace 1/4 cup flour with Dutch cocoa. Black cats get a deliciously dark makeover.
FAQ
How do I know the royal icing consistency is right?
Do the “10- to 20-second test.” Drag a knife through the icing in the bowl.
If the line disappears in about 10 seconds, it’s great for flooding. Around 20 seconds is perfect for outlines and details.
My icing colors bled—help?
Use gel colors, avoid over-thinning, and let base layers crust 20–30 minutes before adding dark details. Dry in a low-humidity environment and keep cookies away from steam or covered containers before they’re fully set.
Can I make the dough ahead?
Yes.
Chill up to 72 hours or freeze up to 2 months. If it’s rock-hard, let it sit at room temp 15–30 minutes before rolling.
What if I don’t have meringue powder?
You can make a simple icing with powdered sugar and water, but it won’t dry as hard or glossy. For royal icing performance, meringue powder is your MVP.
How thick should I roll the dough?
About 1/4 inch for a soft center with clean edges.
Thinner cookies bake faster and crisp more; watch them closely to avoid overbaking.
How long do decorated cookies take to dry?
Surface-dry in 30–60 minutes; fully set in 6–8 hours or overnight. Don’t stack or bag until completely dry, unless you enjoy accidental abstract art.
Can I stack and ship these?
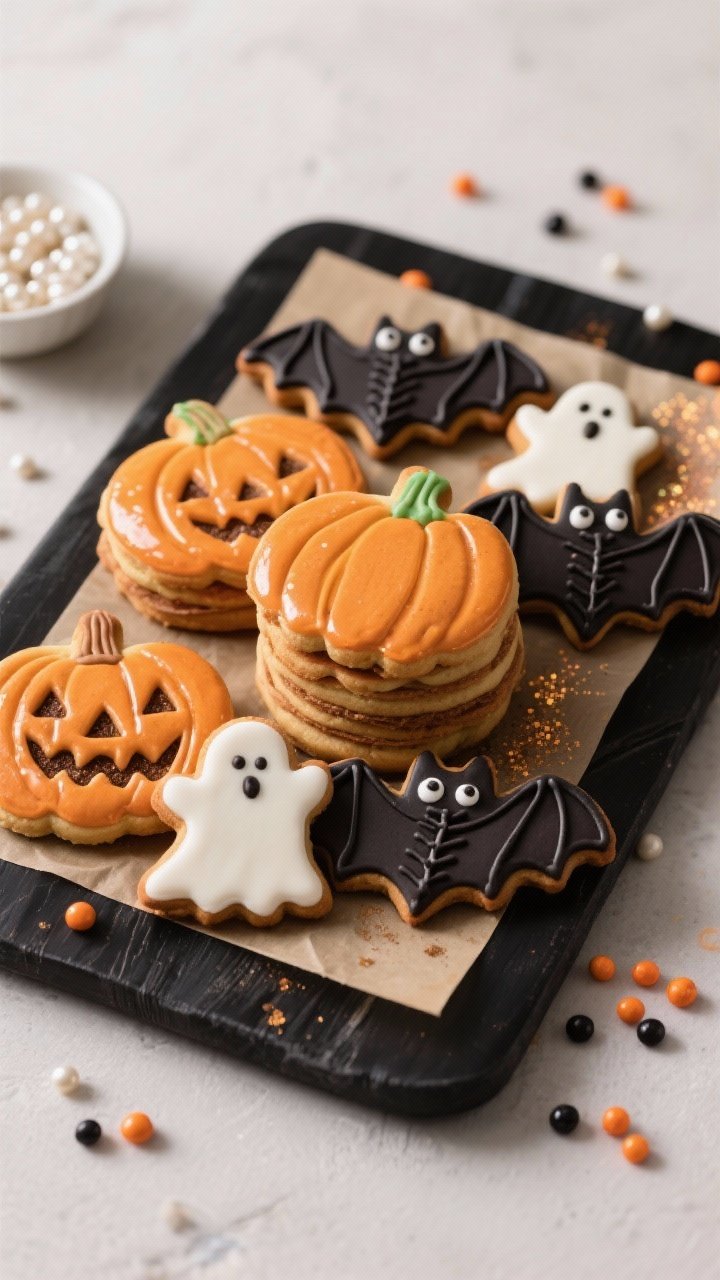
Yes. Once fully dry, layer with parchment and pack snugly.
Choose shapes with fewer delicate points (bats and ghosts travel better than skeleton hands).
What flavors pair well with Halloween designs?
Vanilla-almond is classic. Orange-vanilla, chai spice, or chocolate cut-outs also win. Keep icing neutral to let the designs shine.
The Bottom Line
These Halloween Sugar Cookies with Royal Icing are the rare triple threat: stunning, delicious, and practical to make ahead.
With a chill, a clean roll, and smart icing, you’ll get sharp shapes and glossy designs that actually look pro. Make a batch, throw on a scary playlist, and let your inner cookie artist out—because October deserves treats that slay.
Printable Recipe Card
Want just the essential recipe details without scrolling through the article? Get our printable recipe card with just the ingredients and instructions.

Hi, I’m Hannah — the food lover behind Every Day Quick Meals! I’m all about making cooking simple, joyful, and stress-free. Between work, life, and a million to-dos, I know how hard it can be to find time for homemade food. That’s why I create quick, tasty recipes that anyone can make — no fancy skills required. My kitchen motto? Good food doesn’t need to be complicated — just made with love.